
My middle son shares my passion for all things technical. He begged for a LEGO Mindstorms robot when he was 7, and though we held out until he was 8, it’s been one of his favorite and most-used possessions ever since. Buying him birthday presents is always fun, particularly when I get to play with his new “toys”. Two years ago he became the only kid on the block with his own Van de Graaf generator. This year, we’d been discussing 3D printers and how cool the technology is. I figured that in a few years they would be commonplace enough to buy one. Well, it turns out that the prices have dropped precipitously as a number of 3D printer manufacturers have entered the market. My son turned twelve a week ago, and a 3D printer seemed like the perfect present.
A little Googling revealed that 3D printer kits are available for as low as $300. We talked both sets of grandparents into going in on the gift with us and started researching the various lower-priced models. A number of printer manufacturers (Such as the Bukito, Buccaneer, and RigidBot, to name a few) have put their items for sale on Kickstarter, but many of those printers will not be available for several months. The Printrbot Simple, at $300, seemed like our best option and has the distinct advantage of being available right now. The Simple comes as a kit, or for $100 more, you can get it already assembled. We opted for the kit, both because of the cost and because we thought we’d learn a lot about the design and mechanics by putting it together.
We placed our order, selecting three-day shipping, and received an email that Printrbot had shipped it out about three days later. The package took only two days to arrive via UPS. With great excitement, we opened the box and were greeted by a large assortment of nuts, bolts, screws, wires, motors and laser-cut wooden parts. The instructions were available online, and consisted of 20 pages of assembly images with tersely written directions. We laid out everything, and got to work. The instructions indicated that we’d need a number of different tools, including several diameters of small allen wrenches, screwdrivers. It neglected to mention that we’d need 220 gauge sandpaper, which interrupted our assembly time while I ran to the hardware store to purchase it. I believe that future versions of this kit will be shipping with the sandpaper included.
The instructions said that the printer assembly should take two to four hours. Well, that was clearly a pipe dream, as two hours later, we were still on instruction 12 out of 62, and we’d found that the power cable for the extruder was missing from our kit. Fortunately, Printrbot’s website contains a form for specifying missing/broken components. I filled out the form on a Sunday, and on Wednesday received word that the cable had shipped. Fortunately, we were able to continue construction while waiting for the cable.
Reading other online reviews of Printrbot, we found that several people recommended placing the metal rods that run along the vertical axis of the printer in the freezer before starting construction, to make it easier to insert them through the holes in the assembly in step 4. We tried this, and it seemed to work well. I don’t know how difficult it would have been to get the rods in without freezing them, but it was certainly a snug fit.
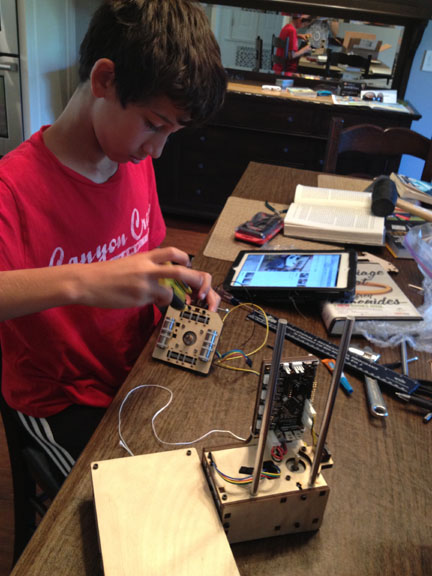
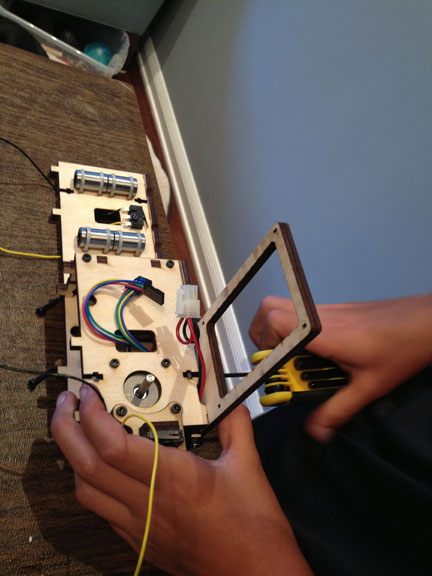
I don’t think that most 12 year-olds would be able to assemble the printer all by themselves. I left it to my son to follow the instructions himself, but stayed in the room with him, looking over his shoulder frequently. I would occasionally catch a mistake he’d made – usually with a part being aligned backwards, or using the wrong length screw. As there are multiple different kinds of screws used in the assembly, I strongly recommend having a metric ruler handy to help differentiate between the different lengths. The pictures in the instructions were generally close-ups, which sometimes made it hard to figure out the overall relative orientations of some of the pieces. Surprisingly, many parts of the machine assembly are held together by small zip-ties. It is important that the ties fit snugly, and that the locking parts of the ties are in the appropriate location, so as not to block other parts of the printer. I stepped in to double check the ties, giving them an extra pull on occasion. The design of laser-cut wood is quite clever, but on at least two occasions we found some of the larger pieces difficult to put together. The motors are attached to the moving platforms by fishing wire, which my son lacked the dexterity to tie as tightly as was required. Still, I’d say he did the significant majority of the work by himself.
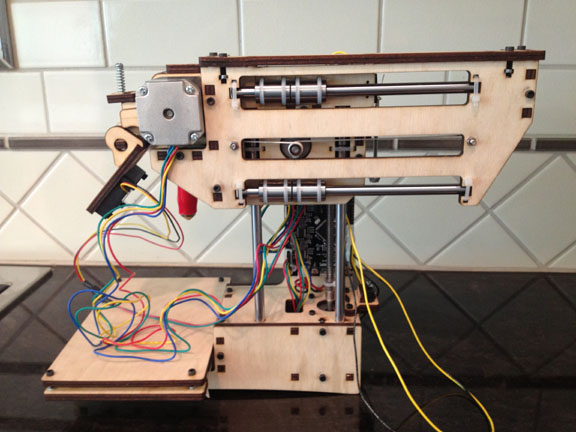
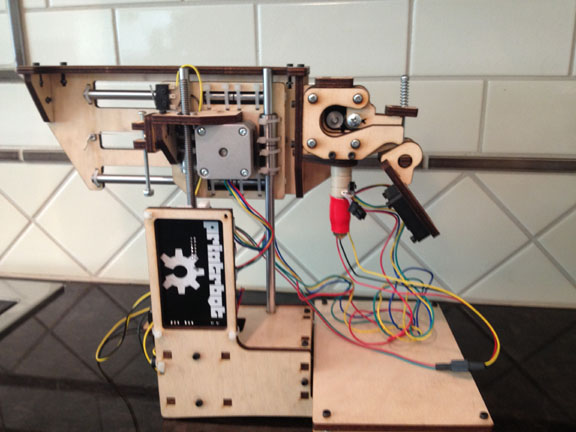
We had one more interruption in our assembly process, as we found that we were missing a 2 1/2″ screw to attach the fan (there was an extra 3″ screw, which didn’t work). It was quicker to go to our hardware store to replace it than to fill out another parts request form. Several days, and about 8 hours of actual hands-on work later, we found ourselves on the last page of the instructions. The printer looked sharp – the laser-cut wood design lends it a sort of steampunk appearance. The assembly itself felt sturdy. Disappointingly, however, the two cables that were supposed to connect the Printrbot extruder to the circuit board were incorrectly put together or missing the appropriate end connectors. So yesterday I went back to the Printrbot website’s support form, and filled out another request for missing parts. I have yet to receive word from them about the cables, but hope they arrive soon, as we are completely done with the rest of the assembly.
A couple of notes on 3D printers, and Printrbot in particular. Two kinds of plastic filament are available for low cost 3D printers, ABS and PLA. There’s a detailed comparison of the two types of filament here. The PrintrBot only works with PLA, which made our decision simple. The printer ships with several ounces of PLA, and we ordered an extra pound for $20.
At the time we ordered, the Printrbot Simple had the option to purchase end stops (which insure that the print bed doesn’t overrun its range) and a fan to help cool the heated PLA as it is laid down by the extruder. These options now appear to come standard with the printer, and the instructions for adding them into the Printrbot Simple assembly have been incorporated into the main assembly guide.
As things stand now, we are waiting for the replacement cables to ship, and I’ll provide an update on the software and actual printing once they arrive.
It took my husband and I about 8 hours to put this thing together… that does include having to hunt down 2 steps that were missing, some screws that were missing (thank you Lowe’s!), and corralling 3 children. 😀 I can’t imagine a kid putting this together.
What do you think could be done to make it easier for kids to put together? Using fewer types of parts? Could the instructions be made any different?
TW
Good question. There’s always the option of buying one fully assembled, which for $100 may be worth it. In the end, it was a good experience for my son to have put the Printrbot together himself, but I don’t think he could have done it without supervision.
My son has been following the directions to build LEGO models since he was five, and is generally good with that sort of thing. I think that unless a kid has that sort of experience, 3D printer assembly may simply be too difficult. Distinguishing between the wooden pieces, and finding the correct one for each step was not actually a problem for us. Distinguishing between the screws and nuts was more difficult. It threw us for a bit of a loop when we found that one of the long screws was actually the incorrect length. Joining a couple of the larger wooden pieces that required simultaneously aligning multiple slots and tabs was quite difficult, and in two cases I had to step in to do it for him. I had a quite a bit of difficulty with those pieces as well. I’m not sure what the workaround for that is, and whether the difficulty was innate in the parts themselves, or whether it was the way we were assembling them.
We found a few of the pictures in the assembly instructions to be a little ambiguous, and in those cases, it would have been helpful to have a photographic view from additional angles. Tying the strings sufficiently tight to move the printer along the axes is difficult for a child as well. I’ve seen some user-designed pieces that attach with one end of the string, and allow the user to tighten the string by turning a screw. Something like that would make it easier for a kid (or adult) to get the strings taut.
One thing that might help would be packaging the parts and screws, nuts and bolts that attach together in their own bags, so that the builder would feel more confident that he has the correct parts for each step. We were pretty careful to measure the length of the specified screws to make sure we were using the right ones. It is easy to make a mistake there.
My son found it a little tricky to know where to plug in each of the electronic components as well, as some of the labels on the circuit board are fairly small and difficult to find. More explicit pictures would probably have helped there as well.
Offhand, I can’t think of anything else, but I’ll ask my son after school and see if he has any thoughts on the matter.
Debra