
It’s hard to avoid the Internet of Things (IoT) these days. I thought I’d join the trend by starting simply. I was inspired by the CheerLights project, which uses a Twitter feed to synchronize the color of lights around the world. I first saw it through a link to an implementation by Dr. Lucy Rogers, who made a color-changing Christmas tree to adorn the cast on her arm.
In the very simplest incarnation, there are browser extensions and smartphone apps which will display the CheerLights color of the moment. However, I wanted an actual Thing to connect to the Internet to become part of the IoT. My Thing is a simple RGB led, and the connection is provided by an Adafruit Huzzah board.
Anyone with a Twitter account can select the current CheerLights color by sending a tweet with the hashtag #cheerlights or tweeting directly to @cheerlights. The tweet must contain the name of one of the following colors: red, green, blue, cyan, white, oldlace, purple, magenta, yellow, orange or pink. The Twitter feed is routed to several different ThingSpeak channels which can display either the last one or most recent several color selections, either by name or in HEX color representation. The available ThingSpeak channels are documented in the CheerLights API.
This project was inexpensive to complete. The components are:
- Adafruit Huzzah ($9.95)
- USB to TTL cable for programming ($9.95) – if you have a FTDI cable, you can use that instead
- RGB LED (mine had a common cathode)
- Breadboard and wires
- 3 Resistors (I used 230 Ohm, but anything similar will do)
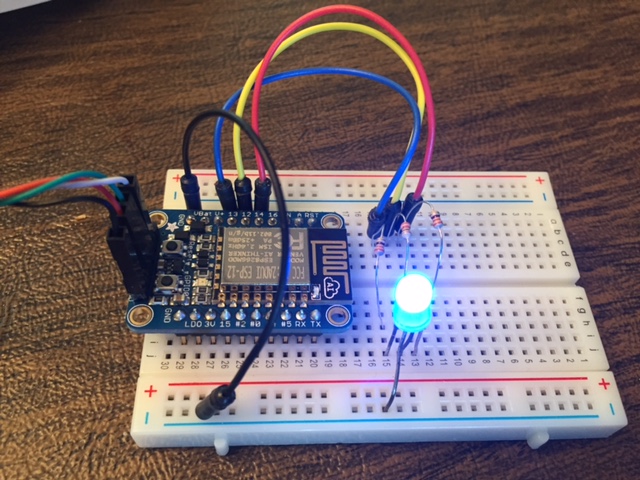
The wiring diagram is below:

I adapted the Arduino source code from this distribution. The only changes were to modify the lights from NeoPixels to a RGB LED. If you have never programmed an ESP8266 board before, I recommend reading this Adafruit tutorial on how to program a Huzzah from the Arduino IDE before uploading your own sketch. The adapted version of the source code is below (be sure to fill in your own values for wireless SSID and password before using it).
[code language=”cpp”]
/*
* Implementation of CheerLights for a simple RGB (common cathode) LED
* using an Adafruit Huzzah. Adapted from source code at:
* https://github.com/bbx10/esp-cheer-lights, which uses neopixels
*/
#include <ESP8266WiFi.h>
#define GPIN 12
#define RPIN 13
#define BPIN 14
const char* ssid = “**YOUR SSID**”;
const char* password = “**YOUR PASSWORD**”;
const char* host = “api.thingspeak.com”;
void setup() {
Serial.begin(115200);
delay(100);
pinMode(RPIN, OUTPUT);
pinMode(GPIN, OUTPUT);
pinMode(BPIN, OUTPUT);
// We start by connecting to a WiFi network
Serial.println();
Serial.println();
Serial.print(“Connecting to “);
Serial.println(ssid);
WiFi.begin(ssid, password);
while (WiFi.status() != WL_CONNECTED) {
delay(500);
Serial.print(“.”);
}
Serial.println(“”);
Serial.println(“WiFi connected”);
Serial.println(“IP address: “);
Serial.println(WiFi.localIP());
}
static unsigned long LastColor = 0;
void loop() {
Serial.print(“connecting to “);
Serial.println(host);
// Use WiFiClient class to create TCP connections
WiFiClient client;
const int httpPort = 80;
if (!client.connect(host, httpPort)) {
Serial.println(“connection failed”);
return;
}
// We now create a URI for the request
String url = “/channels/1417/field/2/last.txt”;
Serial.print(“Requesting URL: “);
Serial.println(url);
// This will send the request to the server
client.print(String(“GET “) + url + ” HTTP/1.1\r\n” +
“Host: ” + host + “\r\n” +
“Connection: close\r\n\r\n”);
delay(500);
while(client.available()){
unsigned long color;
String line = client.readStringUntil(‘\n’);
if ((line[0] == ‘#’) && (line.length() == 8)) {
Serial.println(“setting color”);
int r, g, b;
color = strtoul(line.c_str()+1, NULL, 16);
Serial.println(line);
if (color != LastColor) {
LastColor = color;
r = (color & 0xFF0000) >> 16;
g = (color & 0x00FF00) >> 8;
b = (color & 0x0000FF);
Serial.print(“Red = “);
Serial.print(r);
Serial.print(“, Blue = “);
Serial.print(b);
Serial.print(“, Green = “);
Serial.println(g);
// Huzzah PWM goes to 1024, not 255, so multiply values by 4
analogWrite(RPIN, r*4);
analogWrite(GPIN, g*4);
analogWrite(BPIN, b*4);
}
}
}
Serial.println();
Serial.println(“closing connection”);
// ThingSpeak does not allow updates more often than every 15 seconds
delay(15000);
}
[/code]
The code works very well, and it’s fun to watch the LED change colors unpredictably. It can go several hours without a change, then sometimes it updates itself every 15 seconds, depending on the Twitter activity. If you want to see other CheerLights projects people have built, you can look at the CheerLights website, and maybe get inspired to build your own.